Leave a comment

Setting Up Out of Office Replys

When you are unable to read or respond to E-mails, such as a scheduled holiday or you want a quiet weekend, you can set up an out of office feature that allows an automatic response to be sent to the person who sent you the e-mail. You can set this up so that it also forwards the e-mail to somebody who is available to respond to the e-mail.

To set up out of office, open outlook and go to tools> out of office assistant.

ooo1

This will open the out of office assistant from here you can select whether you are in or out of the office. If you select out of office, the out of office system will be in effect.  Here you can enter your auto reply. This is the message that will automatically be sent to anybody that sends you an e-mail while your status is set to out of the office.


0002

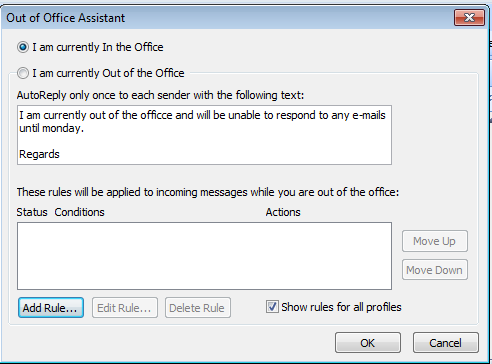
You can add rules so that the out of office system will run for a set number of days, to do this you must add a new rule. To do this click on Add Rule…

ooo3

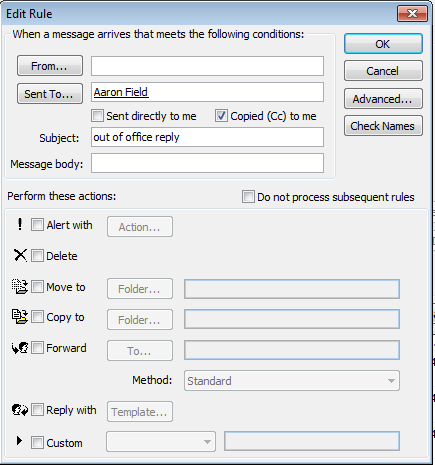
From this window you can add the rules to your out of office system. to select how long out of office is active for you can click advanced button then the next windows appears. From here you can tick the box that says from and to and select the dates that you want out of office to run from. Then click OK to save the settings.

ooo4

If you have selected that you will be out of the office for a select period of time, you can choose to forward e-mails from certain people to other people in you address book. This could be useful if you are expecting an e-mail during the time that you are away, the important message can then be sent to somebody who can answer the e-mail for you. To do this click the from button and select the person that you are expecting to receive an e-mail from. Next click the send to button and chose the person you wish to forward this e-mail to whilst you are away.

Once done click OK to close the wizard and out of office will activate during the times you have set.


Leave a comment

The WMC E-mail system.


This guide will go through the basics of using the college e-mail system, including how to access your e-mails, create new e-mails, attach documents and mark your e-mails as high priority.

To access e-mail, first log into your user account, next go to Start>Outlook 2007 this will open the e-mail application.

email ss1


To open e-mails in your inbox (where your e-mails are stored), click on the inbox icon on the left (1.) This will display your inbox, to open a message, double click it (2.) and it will open in the preview pane on the right (3.)

emailss2

Sending a new e-mail

To send a new e-mail, first go to new > mail message (4.) this will open a new message window as shown below (5.).

emailss3

Adding a contact

To add a contact to the e-mail, click on the To… button and your contact list will appear on screen for you to select who you would like to send the message to, from here you can also chose who you would like to send a copy of the e-mail to. This is useful if you would like somebody to witness your communication between yourself and the recipient. To add a contact to the e-mail select their name from your contact list and then click the To.. button, you can do the same to add CC (carbon copy) or Bcc. (6.) after selecting who you would like to send the message to, click OK and you will return to the new message window and the recipient and cc and bcc (if selected) will be shown at the top of the message window.

emailss4

Adding an attachment

Once you have selected who you wish to send the message to you can proceed to write your message in the box below, If you wish you can also send an attachment with your e-mail such as a document or an image. To do this, click on the attach file icon in the toolbar (7.) and an explorer window will open, in this window you can locate the file you wish to attach to the e-mail and then click insert to attach it to the e-mail . (8.)

emailss5

Sending and send priority

Once the attachment has been attached to the e-mail the user can either send their message to the intended recipients by clicking on the send button (9.), or they can first mark their message as urgent by clicking on the high priority button first. (10.)

emailss6

You’re all set!


Design a site like this with WordPress.com
Get started